I just replaced the coolant in mine. The manual says to remove all sorts of body work, but it can be done much simpler. Pics at the bottom! (boy is my bike dirty...)
There are four locations you need to know about:
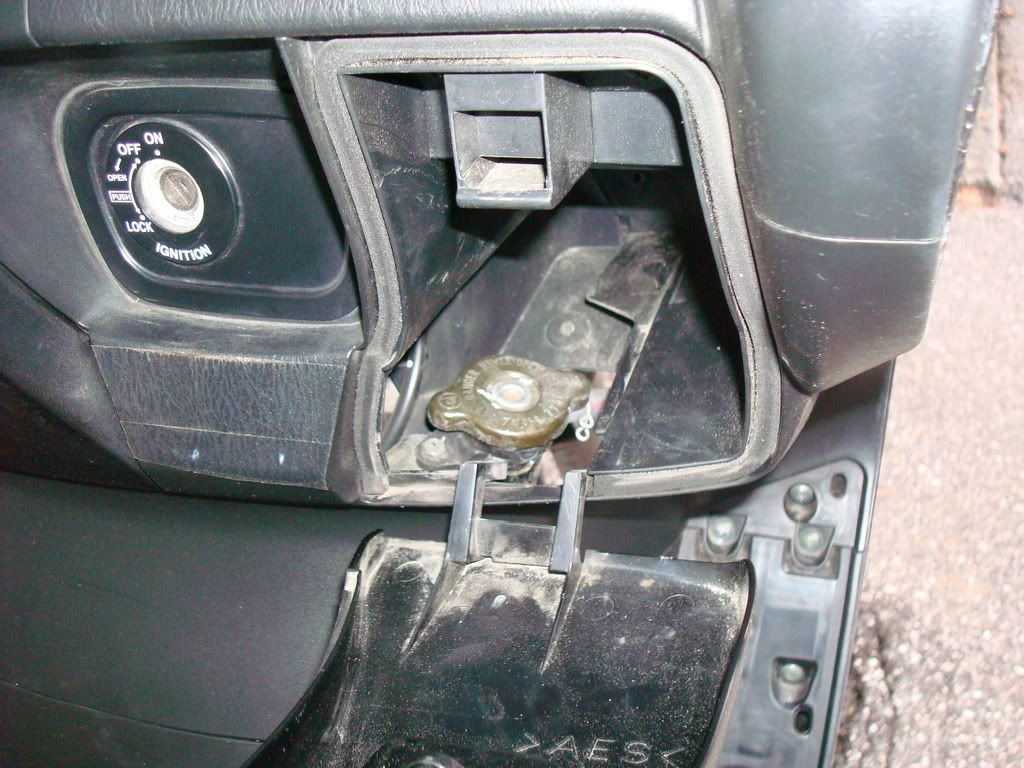
1) The radiator cap which is located under a removeable bottom in the right-hand glovebox. Remove the screw at the back and then slide it forward a bit before trying to lift/twist it out. Don't drop the screw in the hole, or you will never find it again. I learned this the hard way, twice.
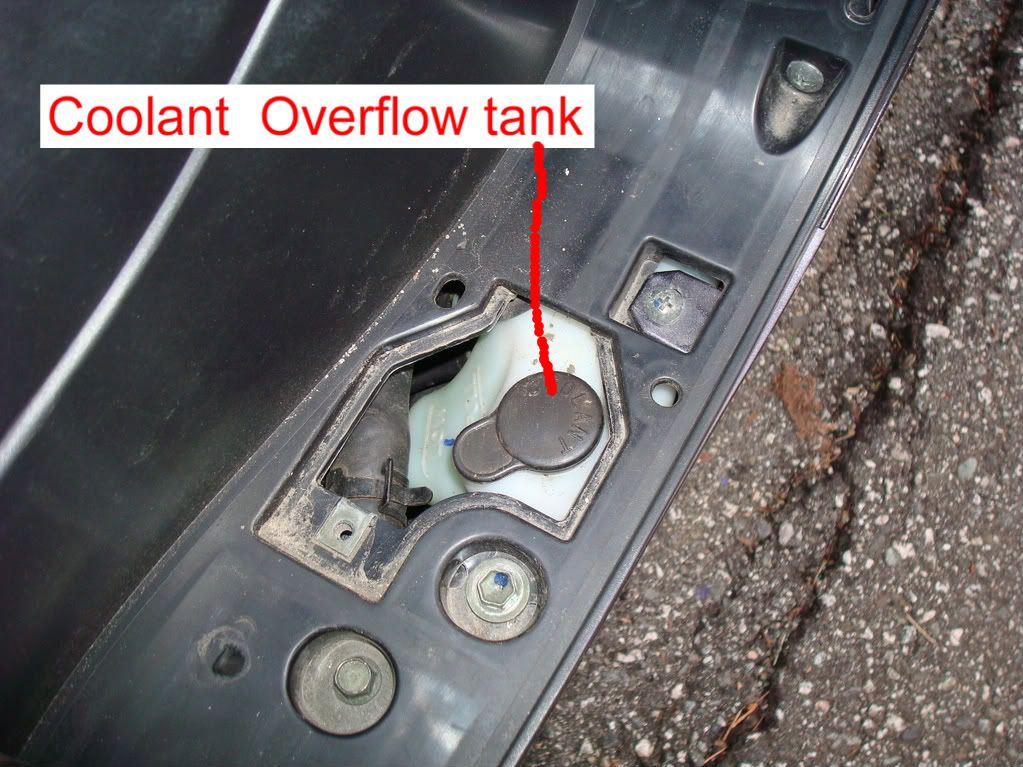
2) The overflow resevoir under the right footboard. Just pull away the rubber tread and then remove one screw to access the cap and resevoir. This is explained in the owner's manual.
3) The coolant drain bolt. This is a small bolt that can be accessed from below the bike. From the right side of the bike, find the pivot for the centerstand. Go up and slightly left about two inches and there is a row of three bolts in the casing. The middle, non-recessed one is the drain bolt. It's about an 8mm head with a copper washer. If you pull out the wrong one, no problem, just put it back.
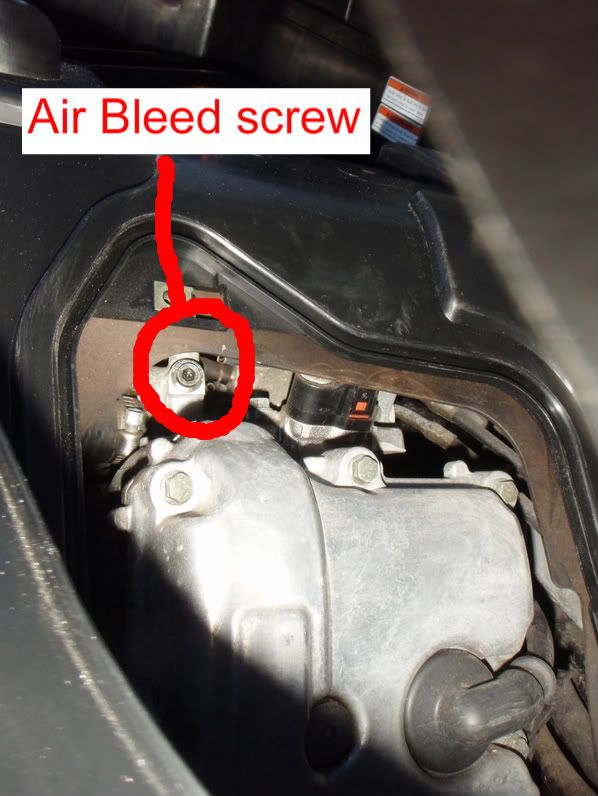
4) The air bleed screw. This is accessed in the same way as the spark plug (look in the owner's manual). If you look up and a bit to the left of the cylinder head, you will see an allen bolt. You can reach it with an allen key, preferably ball-end. The bolt is about two inches long, not completely threaded, so you can back it out a ways without it falling. Be carefull though, since who knows where it'll end up if you drop it!
Tools you will need:
-funnel to fill coolant through the glovebox.
-short hose (1ft or so) to syphon coolant out of the overflow tank.
-container to catch the old stuff, and of course fresh coolant
1) First syphon out all the coolant in the overflow tank.
2) Open the radiator cap
3) Remove drain bolt
4) Back out and remove air bleed screw to let any coolant in the head drain.
5) Put drain plug back in
6) Pour coolant into radiator cap until it comes out of the air bleed hole (about 1.8L)
7) Put air bleed screw back in
8 ) Fill overflow tank to full mark
9) Replace the radiator cap
10) Run the bike for a bit to warm it up, then check the overflow tank level (should be full)
Then put all the pieces back together.
Hope that helps.
![Image]()
![Image]()
![Image]()
![Image]()
There are four locations you need to know about:
1) The radiator cap which is located under a removeable bottom in the right-hand glovebox. Remove the screw at the back and then slide it forward a bit before trying to lift/twist it out. Don't drop the screw in the hole, or you will never find it again. I learned this the hard way, twice.
2) The overflow resevoir under the right footboard. Just pull away the rubber tread and then remove one screw to access the cap and resevoir. This is explained in the owner's manual.
3) The coolant drain bolt. This is a small bolt that can be accessed from below the bike. From the right side of the bike, find the pivot for the centerstand. Go up and slightly left about two inches and there is a row of three bolts in the casing. The middle, non-recessed one is the drain bolt. It's about an 8mm head with a copper washer. If you pull out the wrong one, no problem, just put it back.
4) The air bleed screw. This is accessed in the same way as the spark plug (look in the owner's manual). If you look up and a bit to the left of the cylinder head, you will see an allen bolt. You can reach it with an allen key, preferably ball-end. The bolt is about two inches long, not completely threaded, so you can back it out a ways without it falling. Be carefull though, since who knows where it'll end up if you drop it!
Tools you will need:
-funnel to fill coolant through the glovebox.
-short hose (1ft or so) to syphon coolant out of the overflow tank.
-container to catch the old stuff, and of course fresh coolant
1) First syphon out all the coolant in the overflow tank.
2) Open the radiator cap
3) Remove drain bolt
4) Back out and remove air bleed screw to let any coolant in the head drain.
5) Put drain plug back in
6) Pour coolant into radiator cap until it comes out of the air bleed hole (about 1.8L)
7) Put air bleed screw back in
8 ) Fill overflow tank to full mark
9) Replace the radiator cap
10) Run the bike for a bit to warm it up, then check the overflow tank level (should be full)
Then put all the pieces back together.
Hope that helps.